Five Ways To Organize Google Chrome Better : At first, people were amazed at how easily they could gain information online about almost anything available to them. Today, you still enjoy this convenience on a greater scale; no longer just surfing websites to locate information; instead it has become part of our everyday lives. Your new workspace allows you to stay in touch with friends, stream videos, create documents and even manage projects! Internet has become an integral component of daily life, so with all the activities online and off, it’s no wonder your Google Chrome browser often appears cluttered – with tabs open, notifications popping up all over and no way of knowing from where a YouTube video will play next.
If this sounds familiar, your browser’s disorganization may be impeding your productivity. Here are a few simple tips for using Chrome that will keep it tidy.
Sort all open tabs into groups
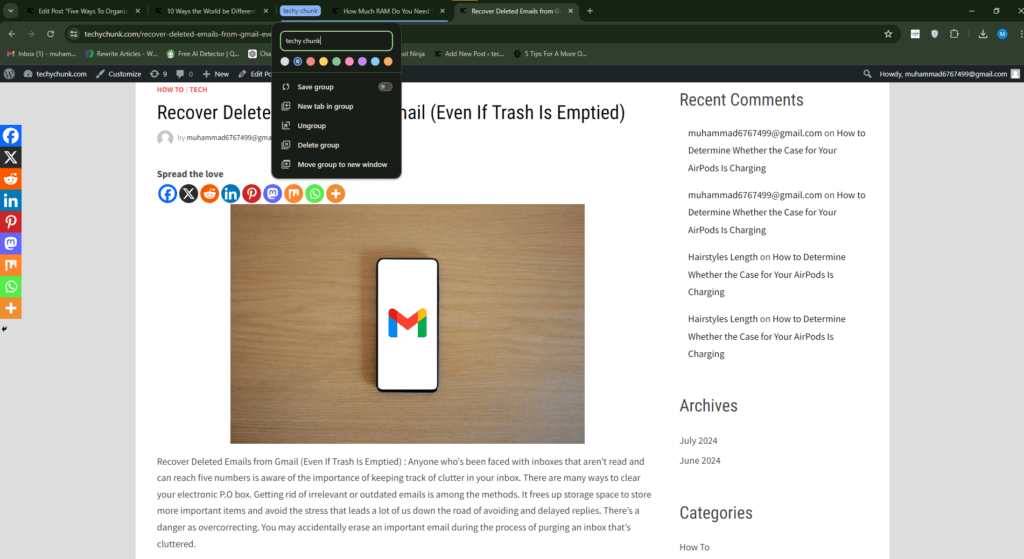
Let me guess: you currently have at least 15 tabs open in Google Chrome, some spanning multiple windows while others don’t remember which tab they were last visited from. Although these tabs may be cluttering your browser, closing them would only create more confusion as they’re “still together”. Although having multiple tabs open may become confusing – at some point your screen could become overrun with tabs, or searching will become time consuming and frustrating
Tab Groups can help keep Chrome organized while also keeping all your tabs in one place, helping you manage tabs better. Google Chrome automatically arranges them into groups for easier management – instead of seeing all 106 tabs at once, only some will appear at any given time – this way letting you use tab groups more efficiently than ever! Here’s how tab groups work:
- With your browser opened, right-click on any tab.
- Select Add tab to new group (or Add tab to group if you’ve already made a tab group before).
- Click on New group.
- Enter a name for your group. Make sure it’s something you can easily distinguish from your other groups.
- Assign a color to your group.
- (Optional) Turn on Save group to save the tab group to your bookmarks bar.
- Drag other relevant tabs next to the tab group you just created to automatically add them.
- To remove a tab, simply drag it away from the group.
- Click on the tab group name to collapse it and hide all tabs inside.
Repeat the process until all your tabs have been organized into an appropriate group.
Create tabs on your reading list or bookmarks for future reference by creating tabs
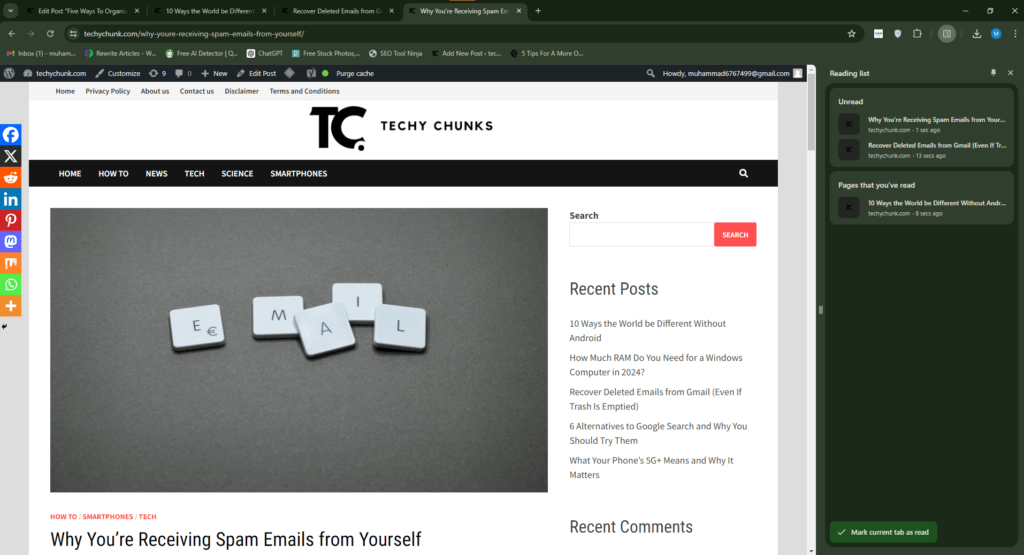
Web pages you need to visit or read later will always pop up unexpectedly, even if they don’t need to be opened immediately. But for fear of losing track, don’t close them just yet as closing could mean losing them entirely. Instead of leaving web pages that you anticipate visiting soon to gather on your tab bar, bookmark them instead! Chrome offers this feature specifically to you so you can make use of bookmarks for pages you anticipate needing soonest. Bookmarks are saved to the bookmarks bar at the top of your browser for easy access, while Reading List is a list of websites you’re likely to return to again and again; pages saved under Reading List are separated into what has already been read as well as those left for later reading, making it easier for you to locate content worth reading next time around.
To bookmark a website in Chrome, navigate directly to it and add an address bar star icon left of the Address Bar. When done, click to complete and you should see your new bookmark appear within your bar of bookmarks. If you’d like to reduce clutter within this section of bookmarks, change or remove page names by right-clicking a bookmark, selecting Edit, entering an elongated label name or simply leaving an icon for its icon on Bookmarks Bar; save changes made before saving changes made.
To add a page to Your Reading list, right-click its tab in the tab bar and choose Add tab to reading list. Afterward, access Your Reading List via Bookmarks & Lists > Reading lists > Show Reading List from the main menu.
Use the Tab Manager Extension to save tabs in groups
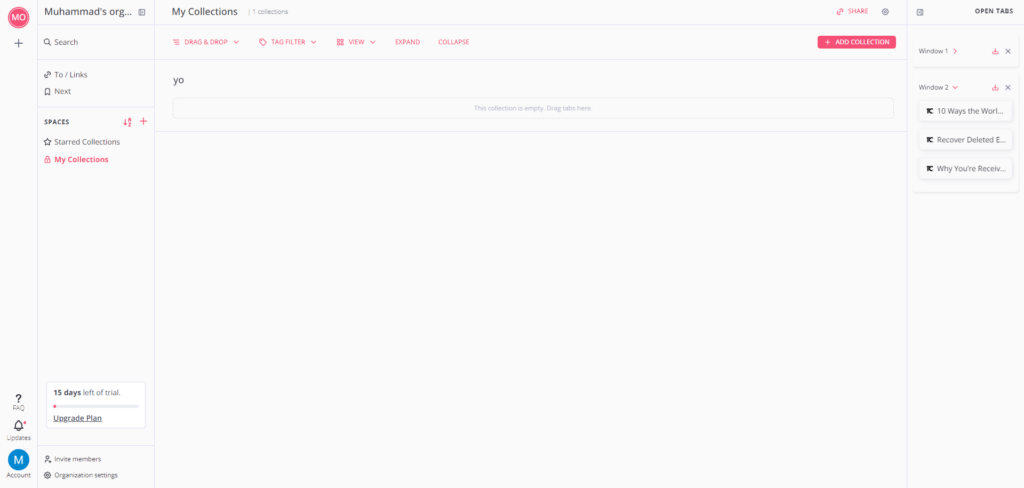
Tab management tools such as Toby can make life online simpler. In just one click, Toby will close all tabs in your browser and organize them for later access – perfect if you have many that you plan to open later! Instead of saving and then closing and reopening them separately window after window, using Toby makes this process streamlined and straightforward – simply follow these steps for using Toby:
- Install Toby from the Chrome Web Store by pressing Add to Chrome.
- Click on Add extension in the popup that appears.
- Create a new Toby account if you don’t have one already.
- Sort your tabs into their corresponding windows. Toby bundles every window into a single group, so make sure your window only contains the relevant tabs you need for that specific group.
- To save a window:
- Open a new tab. This should open to your Toby page.
- On the right side panel, browse through the list for the window you want to save.
- Click on the save icon next to your window of choice.
- Rename your Toby group.
- Press Save to finish.
- To open your group:
- Go to your Toby page by opening a new tab.
- Find the group you want to open.
- Press Open tabs (diagonal arrow icon) next to the group name. The pages saved in that group should automatically open all at once.
Note that to revert back to your previous New Tab settings, Toby must be uninstalled first.
Customize the homepage shortcuts of Chrome browser
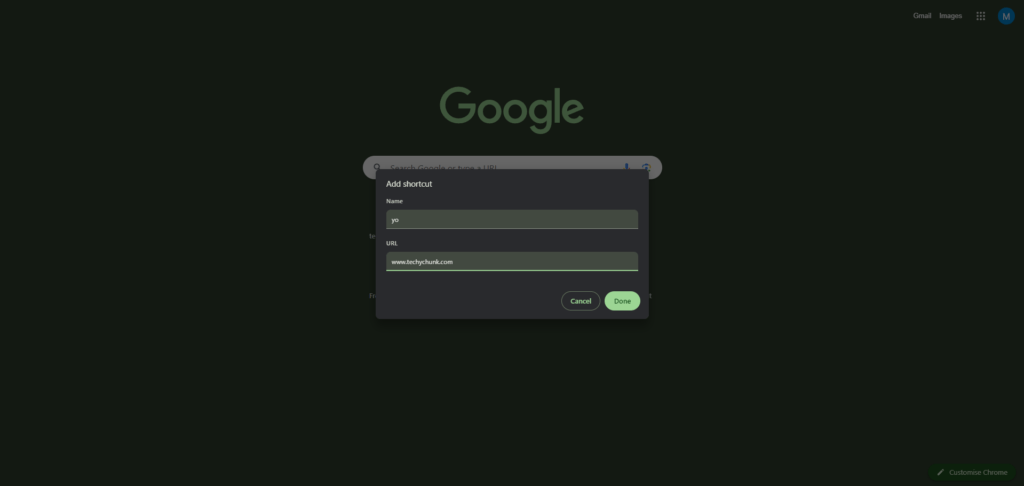
Assuming Google is your default search engine, when you open a new tab in Chrome with Google as your standard search engine you will be taken directly to its homepage where there will be a search bar ready for use. But this homepage offers much more! Not only can you quickly type in queries here; you can also personalize its look to include shortcuts of frequently visited websites making them more readily accessible while clearing away clutter in your bookmarks bar – here’s how you can add these shortcuts for yourself:
- Launch Chrome.
- Set Google as your default search engine by clicking on menu (three-dot icon a the top-right corner) and navigating to Settings > Search engine. Then, change it to Google.
- Open your homepage by clicking on a new tab.
- At the bottom-right corner of the homepage, select Customize Chrome.
- Scroll down to the bottom of the right side panel.
- Turn on Show shortcuts.
- If you want to allow Chrome to automatically create shortcuts of the pages you frequently open, select Most visited sites. You will then see your shortcuts appear almost immediately on the homepage.
- If you want to make the shortcuts by yourself, select My shortcuts. Then, do the following:
- On the homepage, click on the Add shortcut button below the search bar.
- Type your preferred name for the shortcut.
- Enter the address of the webpage.
- Press Done to save your shortcut.
- Click on the shortcut on the homepage to test that it works. This will also update the shortcut’s default icon to the webpage’s icon.
Up to 10 shortcuts may be added directly to the homepage.
Create a separate profile in order to keep your work and personal accounts separate
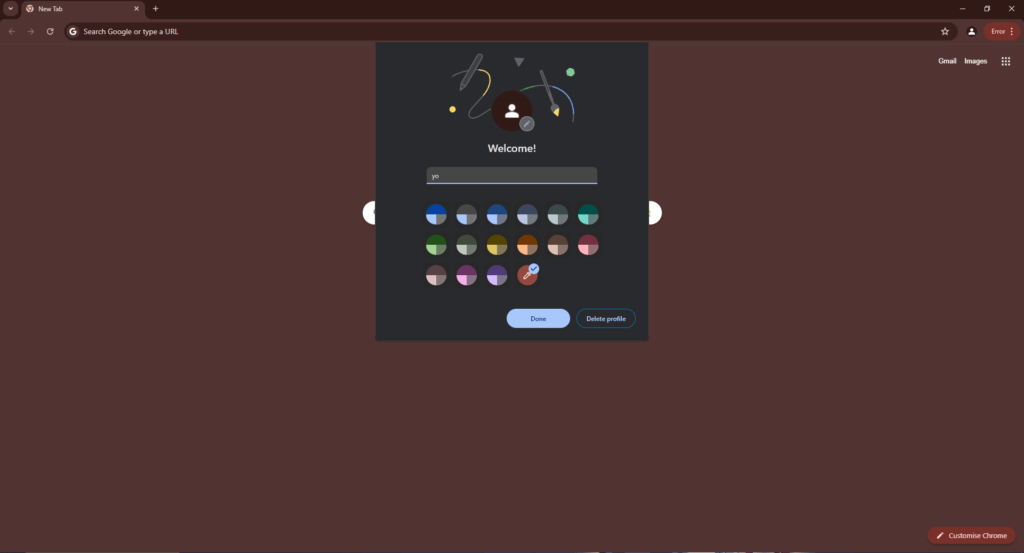
As a student or self-employed professional, chances are your computer is serving both personal and work needs simultaneously. There might be windows for case study research you need to complete as well as garden project development; having two windows might work but quickly becomes overwhelming when multiple ones open at once; bookmarks also get mixed together into one large list, making finding links difficult.To avoid confusion and avoid this issue, it is advised that both personal and professional Google accounts create separate profiles – to do this, follow these steps:
- Click on your profile icon in the top-right corner.
- Under Other profiles, press Add.
- Sign in with a different Google account, or select Continue without an account.
- Personalize your new profile:
- Type a label (e.g., Work, Personal).
- Choose a theme.
- Hit Done to save your profile.
- Select the profile icon at the top.
- Click Edit (the pen icon) to further customize your profile.
- Assign an avatar to make it easier for you to distinguish between your different profiles.
- (Optional) Turn on Create desktop shortcut to add a shortcut to your profile directly on your desktop.
Should it become necessary to switch accounts, it can be done seamlessly by clicking and choosing your profile from the drop-down menu.
Thanks for Reading this article for more information please visit. www.techychunk.com
Q&A
How can I manage multiple tabs more efficiently?
Use tab groups to categorize and color-code your tabs, making it easier to navigate through them.
What are extensions that can help with organization?
Install extensions like OneTab, The Great Suspender, or Tab Wrangler to manage and declutter your tabs.
How can bookmarks improve my browsing experience?
Organize your bookmarks into folders and subfolders to quickly access your favorite websites and reduce clutter.
What is the benefit of customizing the new tab page?
Customize the new tab page with shortcuts and widgets to have quick access to frequently used sites and tools.
How can I use Chrome profiles to stay organized?
Create multiple Chrome profiles to separate your work, personal, and other browsing activities, keeping everything organized and accessible.


